In short
Social Studio is where your posts live. Instant Post sends them, Your posts shows every one — published, scheduled or failed — in a list or a calendar, Insights shows how each account did, and the Library keeps your photos and videos ready.
Before you start
- At least one account connected in
Channels: an Instagram professional account, a Facebook Page or TikTok — Instagram · Facebook Page · TikTok. - An agent needs Post access, or more, to Social Studio in
Team › Agents.
What is in Social Studio
| Tab | What it does | Plans |
|---|---|---|
| Instant Post | Create a post, and see what is coming up and what just went out. | Every plan, Free too |
| Your posts | Every post Instant Post sent — Published, Scheduled and Failed — as a list or a calendar. | Every plan, Free too |
| Insights | Views, engagement, posts and followers over 7, 28 or 90 days, your best posts and your best time. | Every paid plan |
| Library | Your photos and videos in collections, ready for Instant Post. | Every paid plan |
At the top, New Instant Post opens an empty post — how to post. Plan a batch gives each of many videos its own post, spread over days — Plan a batch of videos.
1. Start from the Instant Post tab
Open Social Studio
In MirageCHAT, go to
Social Studio. It opens on the tab you used last.Create a post
On the Instant Post tab, press Create a post. Instant Post opens in six steps.
Check what is coming up
Coming up shows your next three scheduled posts. Scheduled opens all of them under
Your posts.Check what just went out
Just published shows your last six posts with their pictures. Your posts opens the full list.
On Free, the Instant Post tab also says how many of your 30 posts this month are used.
2. Find a post in Your posts
Open Your posts
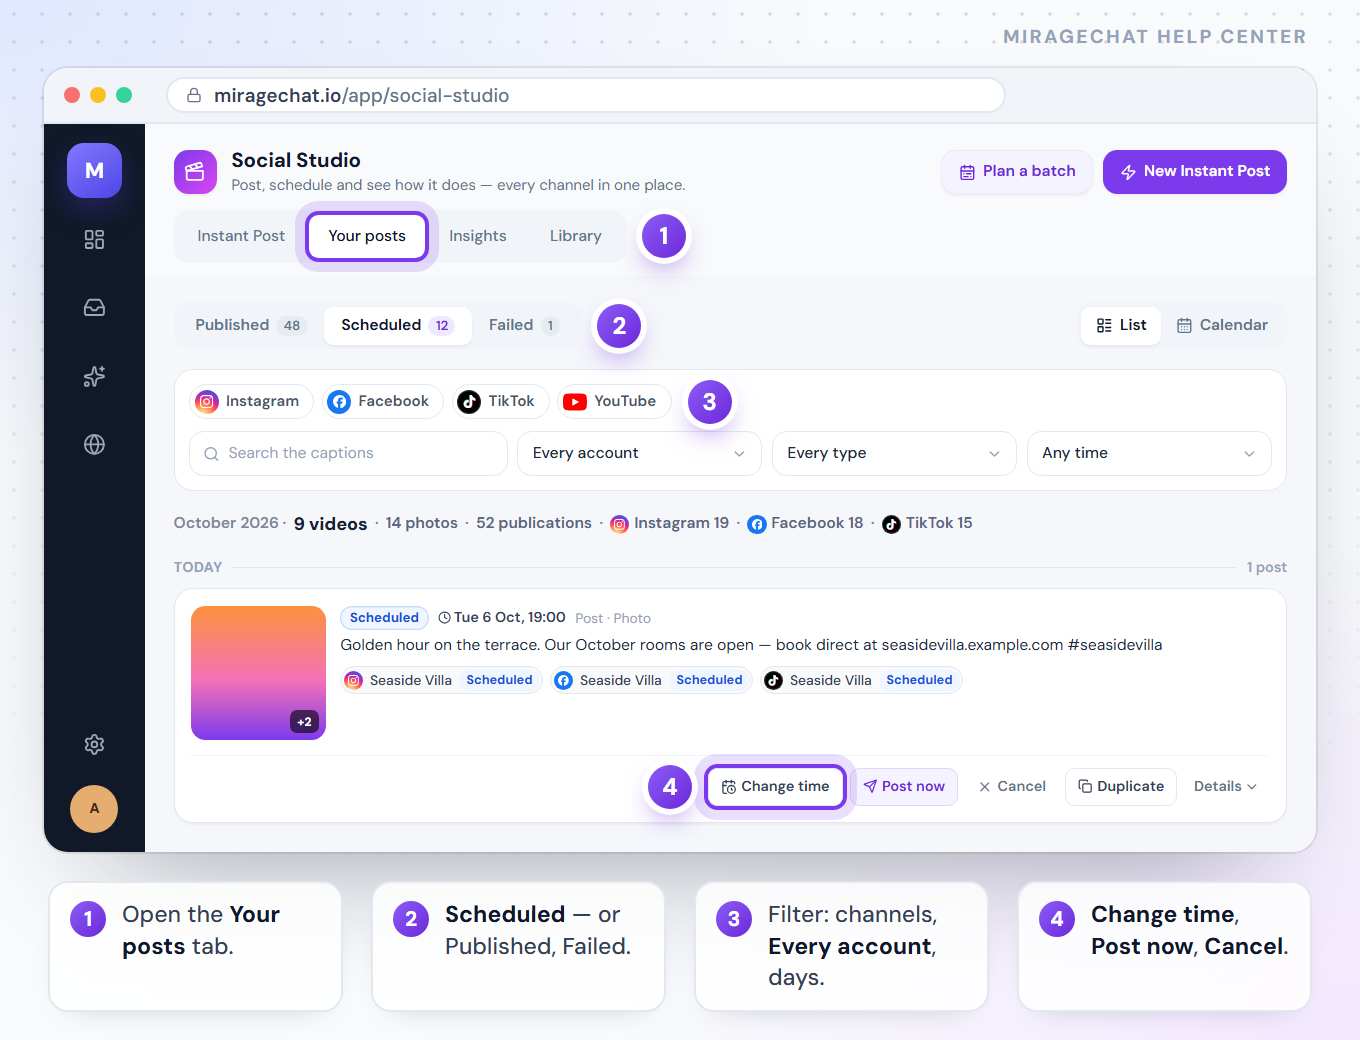
Press the Your posts tab. It opens on Published; Scheduled and Failed sit beside it, each with how many posts it holds.
Pick the channels
Press Instagram, Facebook or TikTok to see only those. With none pressed, you see every channel.
Narrow it down
Choose an account in Every account, a type — Posts, Reels or Stories — and the days, for example Last 7 days, or Next 7 days on Scheduled. Type a word in Search the captions to find a caption. Clear the filters shows everything again.
Read the line above the list
It counts what your filters hold, for example 12 videos · 24 publications · Facebook 12 · TikTok 12: one video that went to two accounts is one video and two publications.
Open the details
Each card is one Instant Post, with a chip for every account it went to and that account’s state. Press Details for each account’s time, the reason if it failed, and Open post ↗ to see it on the platform.
On a paid plan, a published card also shows its views, likes and comments, read from Insights.
3. Change, send or cancel a scheduled post
Open Scheduled
In
Your posts, press Scheduled. Posts are grouped by day: Today, Tomorrow, then the date.Give it a new time
Press Change time, pick a quick time or a day and an hour, then press the button that names the new time — for example Schedule · Tue 6 Oct, 19:00. Keep the old time closes it without a change.
Send it now
Press Post now. The card says how many accounts it goes to right away; press Post now again, or Not yet.
Cancel it
Press Cancel, then Cancel the post. Whatever already went out stays; Keep it leaves it as it is.
4. Fix a failed post, or post one again
Open Failed
Press Failed. Each card shows which accounts failed; Details gives the platform’s own reason.
Fix the cause
If the reason points to the connection, reconnect that account in
Channelsfirst.Press Retry
Retry sends it again only to the accounts that failed. An account that already published is never posted twice.
Or press Duplicate
On any card, Duplicate opens Instant Post filled in: the same photos and videos, accounts, captions and formats. Change what you need, then post. If some photos are no longer in your library, a line says so and the rest are copied.
5. See the month in the calendar
Switch to Calendar
In
Your posts, press Calendar at the top right. List brings the list back.Read a day
Each day shows how many publications it has on each platform. A red dot means something failed that day; today has a coloured outline.
Move between months
Press the month names beside the title, for example ‹ September or November ›.
Open a day
Press a day to see its posts in the list — on Scheduled if anything is still to go out that day, otherwise on Published, then Failed.
Under the month you see four totals — Scheduled, Processing, Published and Failed — and the time zone the days are counted in, which is your device’s. The channel, account and type filters work on the calendar too.
6. See how each account did
Open Insights
Press the Insights tab and choose 7 days, 28 days or 90 days.
Read the four numbers
Views, Engagement, Posts and Followers — each against the days before, when the platforms reach back that far.
Find what worked
Your best posts shows the posts with the most views, with their pictures. When your audience answers shows your best hours and days.
Open one account
Pick it in Every account, or press it under Each account, to see its own posts. Every account takes you back.
Your best time is marked in green when you pick «Later» in Instant Post, and appears there as the quick pick Your best time.
7. Keep your photos and videos in the Library
Open the Library
Press the Library tab. All media holds everything; your collections are listed under it.
Make a collection
Press New collection, type a name — for example Seaside Villa — and press Add.
Upload
Select the collection, add tags if you like — for example
summer, pool— and press Upload to Seaside Villa. JPEG and PNG photos and MP4 and MOV videos, up to 50 at once; duplicates are skipped.See what is left to post
Photos and videos never used come first, marked never used. Once one goes out, small logos show where it was posted.
Rename or delete
Point at a collection to rename or delete it — on a small screen the buttons are always there. Deleting a collection keeps its photos in All media.
Good to know
- Instant Post and Your posts are in every plan, Free too. Insights and the Library tab need a paid plan; without one, Instant Post still takes photos and videos from your computer.
- On Free you can send 30 Instant Posts a month. Each counts once, however many accounts it goes to.
- Nothing is posted by itself. Only what you send or schedule with Instant Post goes out, at the time you chose, with no approval step.
- Insights leaves out stories: they last a day and carry no likes.
- YouTube: a video MirageCHAT uploaded can get a new title, description, visibility or thumbnail, or be deleted, from Your posts — by an owner or admin. Its numbers are in
Analytics › YouTube, never added to the other channels’ totals.
If something looks wrong
A post says Failed
Open Details for the platform’s reason, fix it — often by reconnecting the account in Channels — then press Retry. Only the accounts that failed are sent again.
A TikTok video says “In review on TikTok”
TikTok checks a video before it shows on the profile — usually within minutes, sometimes a few hours — and MirageCHAT keeps checking. After 48 hours with no answer it says “Not public yet · check TikTok”; “Rejected by TikTok” means TikTok refused it.
“Could not change the time. The post keeps its old one.”
The new time was not saved. Pick a time at least 5 minutes from now and within the next year, then try again.
A card says “Deleted on Instagram — no longer counted”
The post was deleted on the platform. It stays in Your posts, but its numbers are no longer read.
Insights shows no best time
It appears once at least 6 posts carry numbers. Keep posting and it shows by itself.
The Insights or Library tab shows a lock
Your plan does not include it. Change your package under Billing — the new one opens at once.
On your phone
In the MirageCHAT app, open Menu › Social Studio. It has the same four tabs and the same Plan a batch and New Instant Post buttons; Your posts has List and Calendar, and each card has Change time, Post now, Cancel, Retry and Duplicate.
Ready?
Opens MirageCHAT in this tab. Sign in first if you’re not already.
Did this guide help?
Related guides
Still stuck? Write to info@miragechat.io with your workspace name. Never send passwords or codes.