In short
Security › Developer connects MirageCHAT to your own systems: API keys to send and receive messages or to publish posts, webhooks that tell your server what happened, and AI tools that let the AI call your own APIs. Every endpoint is documented at miragechat.io/developers.
Before you start
- You are the owner or an admin.
- A paid package. The Publishing API is in Pro.
- Someone to put the key into your system — a developer, or a tool such as Zapier or n8n.
Create a key
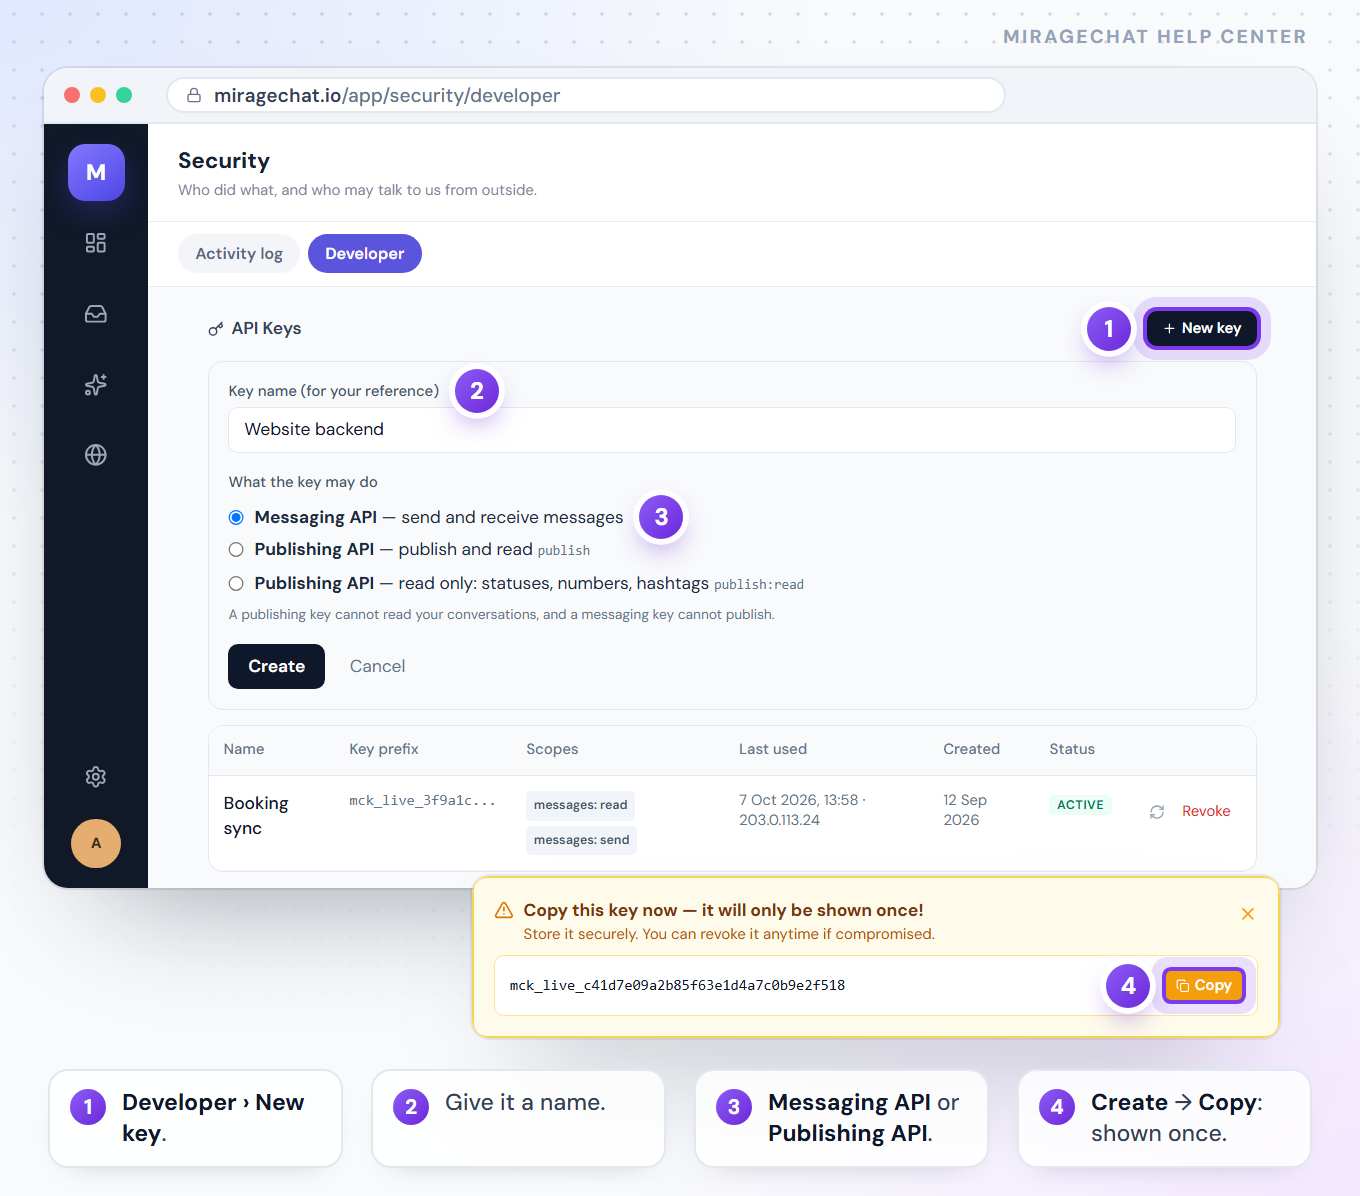
Open API Keys
Go to
Security › Developer, find API Keys and press New key.Name it
Fill in Key name (for your reference) — for example “Website backend”.
Choose what it may do
On Pro, pick Messaging API — send and receive messages; Publishing API — publish and read; or Publishing API — read only: statuses, numbers, hashtags. On other packages every key is a Messaging API key.
Create it and copy the key
Press Create. The key appears once: Copy this key now — it will only be shown once! Press Copy and keep it in your system’s settings, never in an email or a chat.
Your system sends the key with every request, as Authorization: Bearer mck_live_…xxxx, to https://miragechat.io/api/ext/v1. Open API Manual on the same page lists what you can call.
A publishing key can’t read your conversations, and a messaging key can’t publish. Make one key per system, so you can revoke one without stopping the others.
Limit a publishing key
A publishing key has settings of its own. Create works once the accounts are chosen and the confirmation is ticked.
- Allowed IP addresses — one per line or separated by commas; a range such as 203.0.113.0/24 works too. Empty allows any address — list your server’s.
- Accounts this key may post to — Only the accounts I pick, then tick Instagram, Facebook Page and TikTok accounts; or Every publishing account, including ones connected later.
- TikTok — the default route — Approve in MirageCHAT: the post waits in Instant Post until the owner picks who can see it and taps Post. Send to TikTok Drafts: the video goes to the creator’s TikTok inbox to finish in the TikTok app — up to 5 in 24 hours.
- TikTok direct — optional. Ticked, it adds the route Direct: posted on TikTok at once, without approval in MirageCHAT.
- The confirmation — “Posts sent with this key are published on the selected accounts in my name.” Nothing is created until you tick it.
To change them later, press the pencil on the key’s row and Save. Reaching more accounts asks for the confirmation again. A messaging key has no limits to set.
Rotate or revoke a key
| Button | What happens |
|---|---|
| Rotate (the circling arrows) | A new key now, shown once. The old one keeps working for 24 hours — its status says Until and the time — so you can switch your system over without a gap. A publishing key asks for the confirmation again. |
| Revoke | Everything using the key stops at once. It can’t be undone — create a new key if you need one. Revoking a key made by a rotation within its 24 hours offers End the old key too. |
The table shows each key’s name, the start of the key, what it may do, when and from which IP it was last used, when it was made, and its status: Active, Until a time, Replaced, Expired or Revoked.
Send events to your server
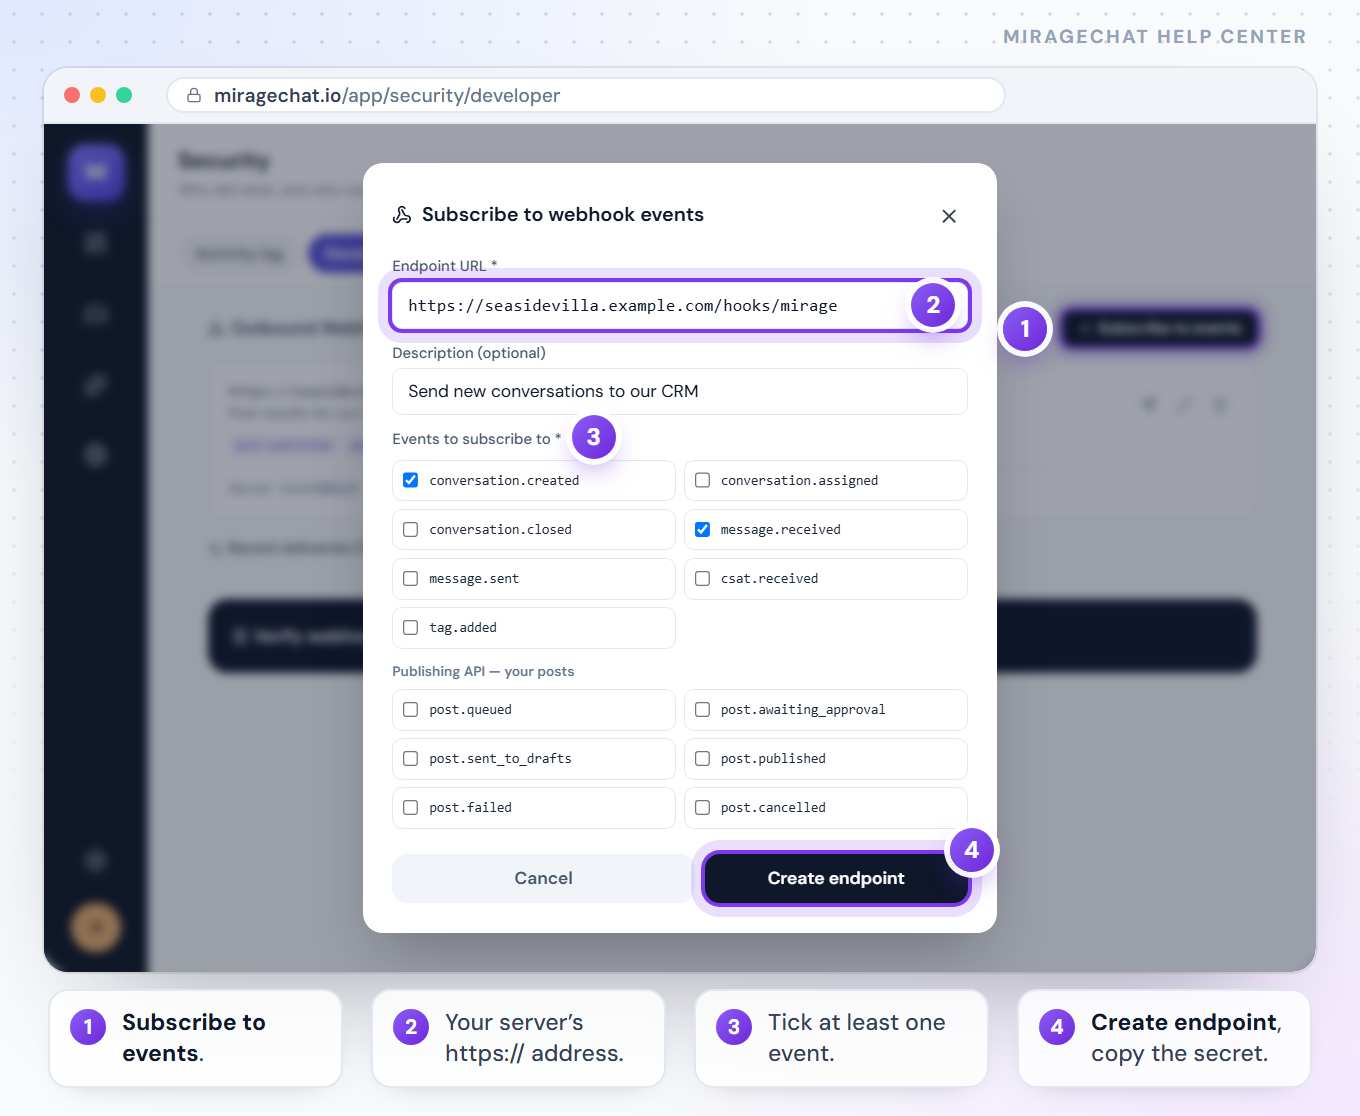
Subscribe
Under Outbound Webhooks, press Subscribe to events.
Enter your address
Fill in Endpoint URL — your server’s public address, starting with https:// — and, if you like, a Description.
Tick the events
Under Events to subscribe to, tick at least one. The table below says when each is sent.
Create it and copy the secret
Press Create endpoint. Signing secret — copy now, shown only once: copy it into your server, which uses it to check that each delivery came from MirageCHAT.
Send a test
Press the paper-plane button on the endpoint. You see “Test sent — HTTP 200”, or the reason it failed.
| Event | Sent when |
|---|---|
conversation.created | A new conversation starts. |
conversation.assigned | A conversation is given to someone. |
conversation.closed | A conversation is closed. |
message.received | A customer writes. |
message.sent | A person or the AI replies. |
csat.received | A customer rates the conversation. |
tag.added | A tag is added. |
post.queued · post.awaiting_approval · post.sent_to_drafts · post.published · post.failed · post.cancelled | A post changes status. Listed under “Publishing API — your posts”. |
Each delivery is signed in the X-Mirage-Signature header. Verify webhook signatures (Node.js example), at the bottom of the page, shows how to check it. Recent deliveries lists each attempt with its answer and time.
Let the AI call your own API
Add a tool
Under AI Tools — connect your own APIs, press New tool.
Describe it
Give it a Function name (letters, numbers and _) and say When should the AI use it? — for example “whenever the customer asks if dates are free at Seaside Villa”.
Point it at your API
Choose the method, enter Your endpoint URL, any headers your API needs, and the parameters the AI must supply.
Save, then test
Press Create tool, open it again, type sample values and press Test to see your API’s answer.
Good to know
- Each key action is recorded in
Security › Activity log: created, changed, rotated and revoked, and every post sent through the Publishing API. - A delivery is tried 3 times, waiting up to 8 seconds each. After 20 failed deliveries in a row, the endpoint is switched off and turns red.
- Private and local addresses are refused. MirageCHAT delivers only to public addresses.
- Moving to Free? Revoke the keys and delete the endpoints you no longer need first — on Free, this page shows only the package card.
If something looks wrong
I lost a key
It can’t be shown again. Press Rotate — the old key keeps working for 24 hours while you switch — or revoke it and create a new one.
“Tick the confirmation to create a publishing key.”
Tick the box with “Posts sent with this key are published on the selected accounts in my name.”, then press Create.
“Pick the accounts this key may post to, or choose every account.”
Tick at least one account under Only the accounts I pick, or choose every publishing account.
“… is not an IP address.”
Use addresses like 203.0.113.7, or a range like 203.0.113.0/24, one per line or separated by commas.
“valid https url required”
Enter the full address of your server, starting with https://.
“That address is not reachable from here.”
The address is private or local. Use your server’s public address.
An endpoint turned red
It was switched off after 20 failed deliveries in a row. Fix your server, press the pencil, tick Active (delivering events), press Save and send a test.
The page shows a lock card
The developer API is in every paid package; the Publishing API card needs Pro. See packages opens Billing.
On your phone
Owners and admins open Menu › Security in the app and the Developer tab: every key is listed, rotated and revoked there, a messaging key can be created, and webhooks and AI tools work as on the web. Publishing keys are created and changed on the web.
Ready?
Opens MirageCHAT in this tab. Sign in first if you’re not already.
Did this guide help?
Related guides
Still stuck? Write to info@miragechat.io with your workspace name. Never send passwords or codes.